
How to Launch Handwriting in the First 6 Weeks: A Step-by-Step Plan for K–2 Teachers
By now, we know that handwriting isn’t just about neatness—it’s about building fluent, confident writers. But even when we want to make it a priority, actually figuring out how to launch handwriting instruction can feel overwhelming.
What comes first—grip or strokes? Uppercase or lowercase? How do I build stamina without tears?
Here’s the good news: You don’t need to reinvent the wheel. You just need a plan that’s developmentally appropriate, research-backed, and flexible enough to meet your students where they are.
Here’s how I structure handwriting in the first 6 weeks of school—and why it works.

Weeks 1–2: Build Fine Motor Skills Before Handwriting Begins
These first two weeks are about prepping the body for writing.
Focus on:
Pencil grip and posture
Paper positioning
Fine motor strength
Pre-writing strokes and purposeful scribbles
Instead of diving into letters, we focus on control—straight lines, curves, zigzags, slants, and circles.
Try This: Purposeful Scribbles to Strengthen Pencil Control
Students don’t need to write letters yet—but they do need time to practice using their tools with control. Use only a handful of crayons (I start with six basic colors) and invite them to scribble with intention.
Here are some prompts:
Scribble up, scribble down — vertical lines (e.g., pretend it’s rain falling or a tree trunk)
Scribble side to side — horizontal lines (e.g., waves in the ocean)
Scribble around and around — circular strokes (e.g., spinning wheels, sun, or tree leaves)
Scribble with feeling — practice light pressure, strong pressure, and back to light (e.g., whisper vs. strong wind)
Encourage students to stay inside outlines or trace over mazes, helping them develop visual boundaries and control.


Try This: Turn Scribbles Into Meaningful Writing Practice
Once students are comfortable with the basic motions, invite them to turn those scribbles into something meaningful. This simple step helps connect pencil movement to creative expression—and makes early writing feel purposeful.
Here are a few ideas:
Scribble up and down inside a narrow box to make a tree trunk
Scribble in a circle to make leaves or a sun
Scribble side-to-side at the bottom for grass
Scribble lightly in a sky area for clouds

Research on Fine Motor Skills and Handwriting
Purposeful scribbling isn't just “free time”—it's how children build the foundational motor patterns they’ll use later to form letters. Research shows that fine motor and visual-motor coordination are essential precursors to successful handwriting (Datchuk et al., 2023). When we build control before content, students are more successful and less frustrated when they begin formal handwriting instruction.
Strengthen Pencil Control With Pre-Writing Strokes
Now that students are comfortable with posture, grip, and movement, Week 3 introduces specific pre-writing strokes that map directly to letter formation.
This is where we introduce:
Straight lines (vertical and horizontal)
Curves, circles, zigzags, and slants
Consistent pencil grip and tool control
Think of this as the “muscle memory” week—the bridge between scribbles and letters.
Reinforce Pencil Grip: Make It Stick With Simple Cues
Even if you introduced grip and posture in Weeks 1–2, Week 3 is when it really sticks.
Students are now expected to maintain proper grip while performing targeted strokes—so it’s worth pausing to revisit the basics.
Refer back to your previous blog post for visuals and cues, or remind students using the Pencil Flip Trick:
Pencil Flip Trick
Lay the pencil down with the point facing you
Pinch the tip with your thumb and index finger
Flip it into writing position
“Pinch and flip!” becomes a quick cue to reset
Research-Backed Reminder:
A correct grip not only supports letter formation, but reduces fatigue and improves writing stamina. It’s worth slowing down here to get it right.
Try This: Use Stroke Cards to Reinforce Grip and Movement
Prepare laminated cards with traceable strokes (vertical lines, zigzags, curves, etc.). Have students grab a card, do the Pencil Flip Trick, and trace each motion using the correct grip. Repeat daily for fluency.
Pro Tip: Offer pencil grips or small stickers as visual reminders if students struggle to remember where their fingers go.
Week 4: Launch Into Letter Formation – Tall & Short Sticks
Now that students have the muscle memory for straight and curved lines, we’re ready to introduce letters—but not alphabetically.
We begin with the easiest group: Tall and Short Sticks
Letter Set Examples:
Tall Sticks: l, t, b, h
Short Sticks: i, r, n, m
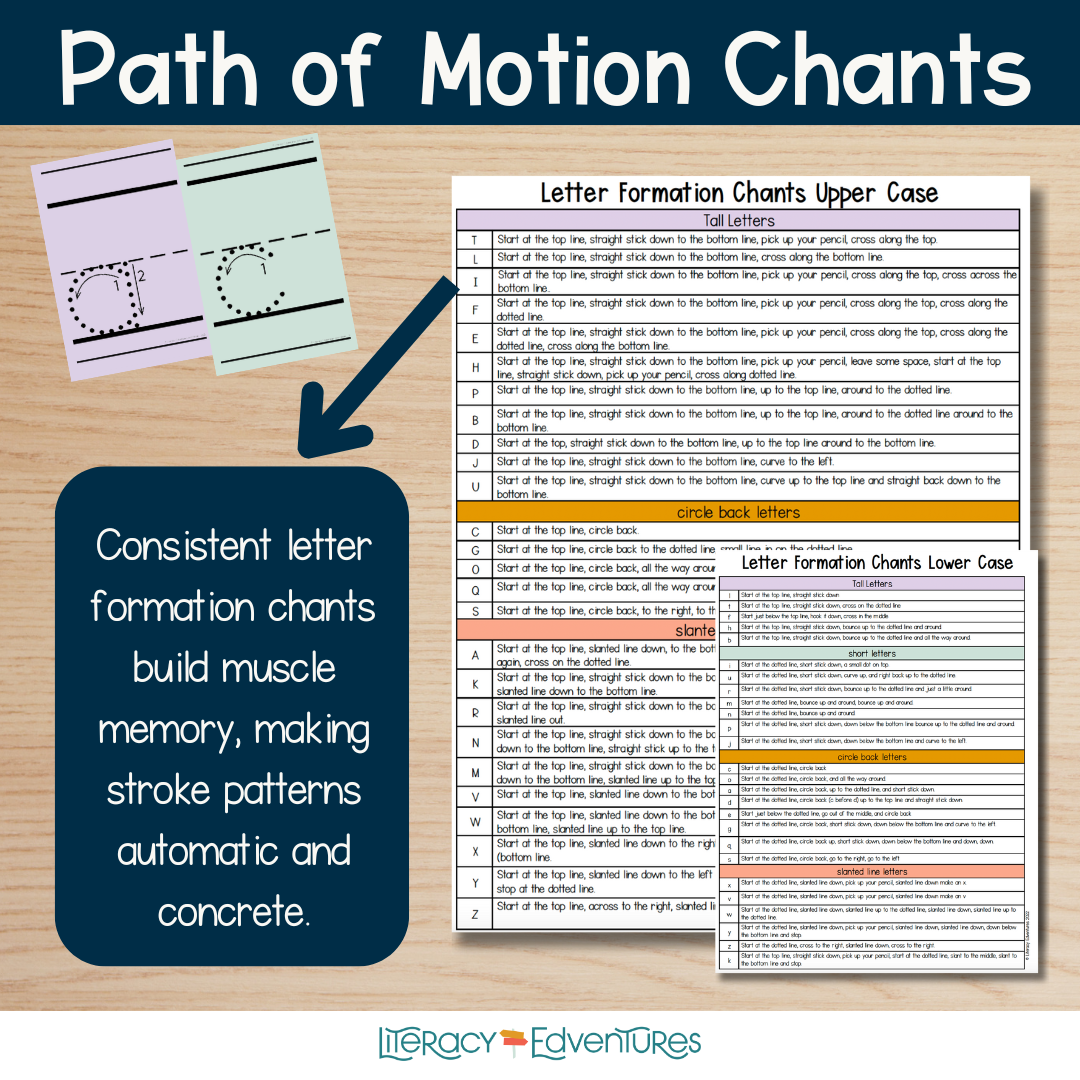
Why This Order Matters Grouping letters by shared stroke patterns allows students to form letters with greater ease and accuracy. Instead of thinking, “How do I make a b?” they remember: “Start at the top, pull down, bounce up and around.”
Try This: Trace Tall & Short Stick Letters With Movement Cues
Create laminated paths or slides where students trace tall and short stick letters using verbal cues.
Example cue: “Start at the top, pull down, bounce up and around.”
Keep practice short and consistent—5 to 10 minutes a day builds fluency fast.

Week 5: Teach Circle Back Letters With Curves and Loops
This week, we transition to letters that start with a curved or circular motion.
Letter Set:
c, o, a, d, g, q
These letters begin with a curve or full circle, then add a vertical line or a tail.
Try This: Cue Students With “Circle First” for Curved Letters
Example cue: “Circle back, up, and down.” (for the letter a)
Use whiteboards or sand trays to practice the stroke first. Visual anchor charts help students distinguish between commonly reversed letters like b/d and g/q.
Teach Slanted Letters and Start Spiral Review
This week, we introduce letters formed with diagonal lines.
Letter Set:
v, w, x, y, z
These require directional control and wrist stability.
Try This: Use “Slide and Cross” for Diagonal Stroke Letters
Example cue: “Slide down, cross over.” (for x)
Practice with multisensory tools like sandpaper letters or finger tracing.
Keep Handwriting Practice Going All Year
In this final week of the initial handwriting launch, don’t just move on. Instead, begin a routine that spirals back through all letter categories regularly.
By now, students have been introduced to:
Tall Stick Letters
Short Stick Letters
Circle Back Letters
Slanted Letters
Your Ongoing Weekly Structure
Here’s how I break down letter formation practice throughout the rest of the year—just 10–15 minutes per day, as Louisa Moats recommends:
Monday: Tall Stick Letters
Tuesday: Short Stick Letters
Wednesday: Circle Back Letters
Thursday: Continue Circle Back or Review
Friday: Slanted Letters
This keeps practice predictable, consistent, and cumulative—which helps students build fluency.
Research Connection: “Handwriting instruction in kindergarten and first grade should include 10–15 minutes per day of direct letter formation instruction.” —Louisa Moats
Why Handwriting Fluency Matters for Young Writers
Handwriting fluency isn’t just about making neat letters. When students can form letters automatically, they can focus on spelling, composing, and organizing their ideas.
By introducing writing through strokes, building habits with consistency, and weaving letter formation into your daily routine, you’re not just teaching handwriting—you’re building confident writers.
Final Thought: Keep It Short, Consistent, and Joyful
Whether your students are scribbling for the first time or mastering tricky letters like q and z, every stroke matters. Keep it short, consistent, and joyful—and you’ll see their confidence grow.
Grab this freebie below and get started!
