Phonics Lesson Part One
So you’ve heard about how our brains read and how vital explicit phonics instruction is. If not, check out my podcast which discusses this very subject. Now I will share with you a 3-part recipe for good phonics instruction.
When teaching phonics, we always want to be sure we are focusing on three parts: a warm-up, explicit teaching, and application of skills. The focus of this blog post (Part #1) will be the warm-up portion of the phonics lesson which contains four parts: a visual drill, auditory drill, blending drill, and, if time allows, a vowel intensive. In Part #2, we’ll be chatting about the second two parts of a phonics lesson: explicit teaching and application of skills.
Before we go over the four parts of the warm-up, let’s recap a bit about the connection between phonemic awareness and phonics since that's what comprises our warm-up. Phonemic awareness will be the first piece in this phonics warm-up, and research shows that it is most effective when it’s applied to print. When you’re doing a quick phonemic awareness lesson, be sure to cover the most important parts:
Phoneme blending: “My word is ‘c-a-t.’ What’s my word?”)
Phoneme segmentation: “My word is ‘cat.’ Can you sound out the sounds you hear?” Students can use manipulatives for this portion as well.
Phoneme isolation: “Listen carefully. ‘Cat.’ Where do you hear the /a/ sound?”
Though these are crucial components, it’s simply just a warm-up. We certainly want to practice these phonemic awareness skills, but we don’t want to spend too much time hanging out here - three minutes will do just fine.
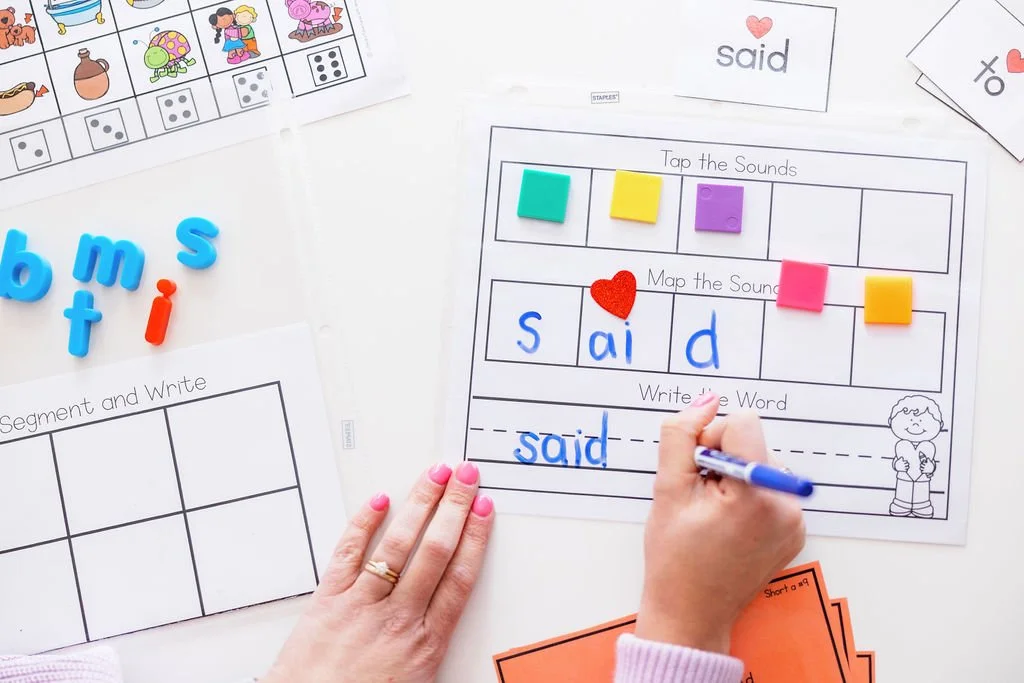
We must also connect our phonics skills to our phonemic awareness skills - the two work hand in hand. Therefore, when we are creating our warm-up, we must choose words that relate to the phonics lesson the students are learning. If you don’t have your own, you can snag mine here.
Why? Because it’s a warm-up, of course! They’re warming up their brains for what’s to come - connecting the sound to the symbol. For example, if your students are going to be learning about the short a, make sure that the words you use in your phonemic awareness warm-up contain words like cat, hat, jam, and man.
So, after our brief phonemic awareness warm-up, it’s time to focus on those symbols (phonics!). This is now the official warm-up portion of our phonics lesson. The phonics warm up comes in four parts, as mentioned before: a visual drill, an auditory drill, a blending drill, and a vowel intensive. Now it’s true that even just a three-part drill can take a while. Of course, in an ideal world, we’d love to go through all three (even four!) of these drills each day. But we know that in teaching, our days are filled with distractions and surprises and it can be hard to fit all of this in. If it works better to complete the first two drills one day and then finish up with the last two the following day, that’s fine! Allow yourself the space to find what works for your classroom. Now, let’s get to the warm-up!
Visual Drill: Time to pull out some flashcards! An ABC deck of cards is the perfect activity for a visual drill. If you don’t have a deck, you can grab mine here. The key to these visual drills is working only with sounds they already know (this can include individual letters, digraphs, vowel teams, etc.) This visual drill is simple: hold the stack of cards and as you flip through them, students say the sound. I want to encourage you here that we don’t need to reinvent the wheel. Short, simple drills like these are effective. We don’t always need to make a spectacle of the lesson. After all, a drill is just that - something short, sweet, and to the point. Next up?
Auditory Drill: For this portion, we want our students to be writing. And the best part about this auditory drill is that it can come in a variety of really fun forms. Give the students a salt tray, Canva screen, white board, or pair them up with partners to write on each other’s backs. Then, grab their attention and say, “How do you spell mmmmm?” As they’re writing the letter, have them say the /m/ sound out loud. Snag the resources for the warm-up you need here.
Blending Drill: This drill can be done in lots of different ways, depending on your preference. The goal here will obviously be blending, but before you begin, decide which blending “tool” works best for you. Some teachers prefer cards with graphemes on them, some really like blending boards, and others (like me) prefer a good old fashioned white board. Depending on your choice, practice blending by flipping through the grapheme cards and work on segmenting and then blending. You can draw a quick grapheme box on a white board and do it that way as well. One of the best things you can do during this blending drill is to review lessons that you’ve previously taught. For example, if you’ve recently gone over short a and short i, include words that contain those phonics skills. “I wrote ‘cat’ on my whiteboard. Let’s sound it out. C-a-t. Cat! Let’s erase the ‘c’ and change it to a ‘b.’ What word do I have now? Bat! Yes. Now lastly, let’s change that ‘a’ to a ‘i.’ Now what’s my word? Bit!” Snag the resources for the warm-up you need here.
Vowel Intensive: This is simply a chance to review short vowel sounds explicitly. We want to review them at the single sound level, syllable level, and CVC level. With this activity, I provide them with a vowel strip that has A, E, I, O, and U on it with a picture representation below the vowels. These are good to use for students who need that extra support with the corresponding image. Another fun way to do a vowel intensive is vowel tents. Simply take some notecards, fold it in half to make a tent, and write a vowel on each of them. Then, take them through each level. Sound level: “The sound is /i/.” Students lift up their i tent (or point to the i on their strip) and reply, “I says /i/.” Syllable level: “The syllable is /ab/.” Students hold up their a tent and say “A says /a/.” CVC level: “The word is ‘bet.’” Students again hold up their E tent and say, “E says /e/.” Snag the resources for the warm-up you need here.
Now, the next thing we will talk about isn’t a drill per say, but it is so important to incorporate this unsung hero into your drills - and that’s review. Reviewing is such a critical component and we forget about it all too often. We must continuously review previously taught material because we can’t just teach a skill for one week and expect our students to be masters of it. We must circle back in order for them to decode with automaticity. Once this happens, they become fluent readers. When words come to them automatically and they’re reading fluently, students can take that cognitive load off of deciphering each word and focus on the text. This lends itself to vocabulary and comprehension and more. That’s why the review is so important! It needs to be done every day in order to attain that automaticity we want for our students. These drills ensure that we’re reviewing previously taught skills. Some of my favorite activities are linked here.
A great way to review is to simply pull activities that you did the previous week. You might pull out a fun, short activity that you worked on several days ago, or bring back a fluency grid that you already used. Review doesn’t need to take place in a different activity or under a different guise. It can easily be an activity you’ve already done! You can even have students re-read a decodable that focuses on a skill you taught not too long ago. Again, you don’t have to reinvent the wheel here - you just need to make a bit of time for review (three minutes is all it takes!)
Last but definitely not least, it’s important we review heart words, too. But how? After we’ve taught them heart words by phoneme-grapheme-mapping and we’ve explained to students there are parts of the word we need to know by heart, our hope is that they’ve orthographically mapped them in their brains. (New to the orthographic mapping process?? Grab this start-up kit)Now, some kids need to practice and sit here a bit longer than others. But after they have a good grasp on heart words, it is then where we can whip out some flashcards and drill them. Yes, flashcards do have a place in literacy - and it’s right after we have mapped words, explicitly taught them, and practiced them. After this, we can work on automaticity, so don’t be afraid to use flashcards for the review! We aren’t teaching them with flashcards - we are merely reviewing.
I hope this blog post shed light on how to conduct your phonics warm-ups. The sister blog post, Part #2, will cover the two remaining components of a phonics lesson: explicit teaching and application of skills. In the meantime, check out some helpful phonics resources below!
Helpful Phonics Resources:
Phonics Reading Roadmap: phonics instruction with the science of reading in mind. Learn how to teach systematic and explicit phonics instruction.
Kindergarten Roadmap: focus on letter sounds and phonemic awareness, and be equipped with tools you’ll use in your small group lessons that will encourage phonics and decoding
Phonics Lessons & Activities MEGA Bundle: includes a scope and sequence, blank templates, phonemic awareness warm ups, drill cards, sentence pyramids, and so, so much more.
Blog Posts:


